Many friends have heard that Internet set-top boxes are better. You can use TV to watch online video and live TV. However, many friends have been attracted to buy network set-top boxes, but do not know how to use them. Can only look at the network set-top box in a daze. This experience will inevitably happen when it comes to new things. Just as when the author first installed the wide top box, he made a lot of jokes. In order to avoid the situation where a friend who purchased a network set-top box and the author happen to be in the same situation, here today to teach everyone how to use the network set-top box. I hope everyone will not have to be confused when they first face the Internet set-top box.
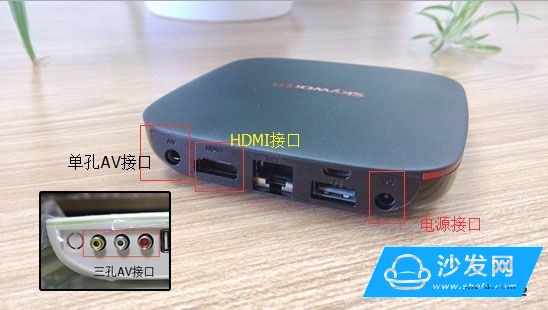
After getting the network set-top box, we must first solve the problem of installation. After all, just touching this thing, there are a lot of accessories placed in front of the various interfaces are not familiar with, really a bit embarrassed. In fact, only a few interfaces are more important in the installation, the first is the HDMI interface, the second is the power interface, but for the old TV without HDMI interface, then the first important interface is the AV interface on the TV box. . The AV interface in the network set-top box is divided into two types, has been a single-hole mode, a three-hole mode. (Do not understand the friends of these interfaces can see - Figure 1)
Flat TV installation


At present, flat-panel TVs have HDMI interfaces, and most network set-top boxes will come with HDMI cables. Therefore, the installation of network set-top boxes on flat-panel TVs will be very convenient. Simply connect the Internet STB with the flat-screen TV using the bundled HDMI cable. After connecting the power adapter to the network STB and turning it on, the network STB will work. At this time we turn on the TV, but it will not show the interface of the network set-top box. We also need to adjust the TV input. Here's a Sony TV, for example. Click the input selection button on the remote control and select the corresponding HDMI output. At this moment, the interface of the network set-top box will appear on the TV.
Old TV installation
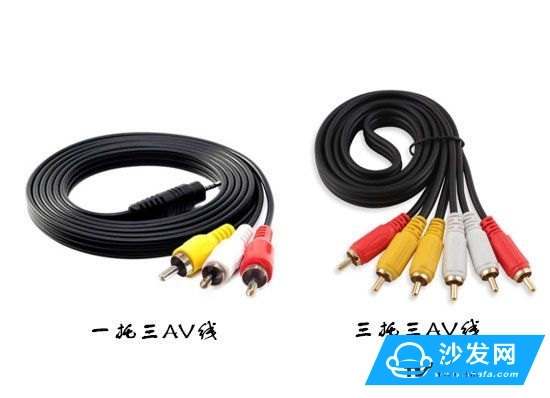
Since the old TV does not have an HDMI interface, we need to use the AV interface to connect. In general, the TVs are all three-hole AV interfaces, while the network STBs have two interfaces, one is a single-hole mode, and the other is a three-hole mode. The different AV interfaces provided by the network set-top boxes allow us to use different cables when connecting to older televisions. If it is a single hole, you need to select a three-mode AV cable. If it is a three-hole AV cable, you need to select the three-line three-mode AV cable. (The two kinds of wire are distinguished - see Figure 5) After confirming the wire that should be used, we use the appropriate wire to connect the old TV to the network STB. Then plug in the power again and the network set-top box will start working. However, there will be no screen display on the TV. At this time, we need to press the AVTV button of the old TV remote control and enter the interface of the network STB.
Add an app
After installing the network set-top box, but now because of the limitations of radio and television, many of the contents of the network set-top boxes have become very scarce. Therefore, we also need to install third-party video applications for TV boxes to enable the network set-top boxes to truly meet our needs. So how to install third-party applications for users. At this time we need U disk help.
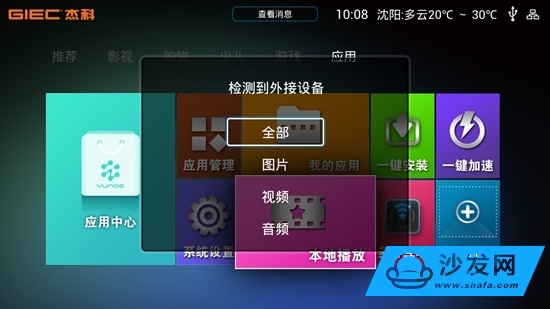

After everyone has prepared the U disk, we can download the third-party APP that we want to install on the network set-top box on the computer. When the download is complete, the user saves the downloaded third-party application to a USB flash drive. Stored directories are free to use, but they are placed in a location that is easy to find. At this time, we can unplug the U disk from the computer and insert it into the USB port of the network STB. At this time, the general network set-top box will have a U disk insert prompt, we follow the prompts to find the third-party APP applications that you want to install click to install. If the network set-top box does not raise the U disk insertion information, the user can view the labels in the local playback, local player, file management, etc., and also find the storage data of the U disk.
After installing the network set-top box and adding third-party APP applications, we can use the Internet set-top box to watch TV live broadcasts and online video on demand content.
Product Features
Automatic switch from Boost charge to Floating charge
Constant voltage with current limited
Colorful LCD touch screen - real-time display the working state and running data.
Low output ripple – Makes the charger ideal for all battery types
Full Protection - OVP, OCP, SCP, UTP, reverse connection and other error alarming.
Switching Mode Power Supply,Switching Power Supply,Switching Mode Power Supply 12V,Portable Switch Mode Power Supply
Xinxiang Taihang Jiaxin Electric Tech Co., Ltd , https://www.chargers.be